This is a tutorial on how to use data from the Touch OSC touch-screen interface and the OSCP5 java libraries to create a visualizer in Processing. Discussion includes installing and running the OSC P5 libraries for the Eclipse environment in Processing, building some funky visualizations in Processing, and configuring a Touch OSC touch-screen interface on a mobile device. Authoring environment is a MacBook pro with 4gigs of ram with 2.5 MHZ processor. OscP5 is a library written by Andreas Schlegel for the programming environment Processing. OSC is the acronym for Open Sound Control, a network protocol developed at cnmat, UC Berkeley. TouchOSC is designed by the fine folks over at http://hexler.net
About Processing
from Processing.org:
Processing is an open source programming language and environment for people who want to create images, animations, and interactions. Initially developed to serve as a software sketchbook and to teach fundamentals of computer programming within a visual context, Processing also has evolved into a tool for generating finished professional work. Today, there are tens of thousands of students, artists, designers, researchers, and hobbyists who use Processing for learning, prototyping, and production.
About Touch OSC
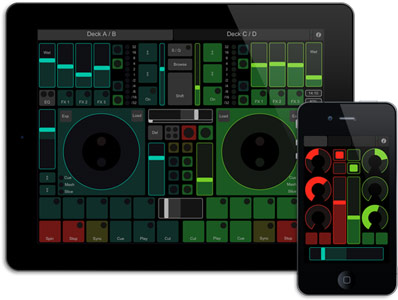
Touch OSC is a modular OSC and MIDI control surface for iPhone / iPod Touch / iPad and Androi. It sends and receives Open Sound Control messages over a Wi-Fi network using the UDP protocol and supports both CoreMIDI and the Line 6 MIDI Mobilizer interfaces for sending and receiving MIDI messages.
About Open Sound Control and OSC P5
OSC is the acronym for Open Sound Control, a network protocol developed at cnmat, UC Berkeley. It is a protocol for communication among computers, sound synthesizers, and other multimedia devices that is optimized for modern networking technology and has been used in many application areas. For further specifications and application implementations please visit the official osc site: http://archive.cnmat.berkeley.edu/OpenSoundControl/
OscP5 is a library written by Andreas Schlegel for the programming environment Processing.
About this tutorial
“Touch OSC Visualizer using Processing” involves configuring a set of libraries that can be compiled with the Processing programming environment to parse and manipulate OSC data, and using that data to create visuals.
Use this tutorial however you want, feel free to add to it, be sure to forward it to whomever and give it away for free. If you charge some lazy bastard for this tutorial, you suck. If you use it for a performance and you make money– you rock! If you have some questions, advice, or praise, contact me at:
info(at)ericmedine(dot)com
What you will need
– Processing environment and compiler.
– OSC P5 libraries
– Eclipse coding environment
Other resources:
Processing experiments:
http://www.openprocessing.org/
Processing in Eclipse:
http://processing.org/learning/eclipse/
Touch OSC
http://hexler.net/software/touchosc
OSC P5
http://www.sojamo.de/libraries/oscP5/
My website:
https://ericmedine.com
1) Prepare your workspace: Download and install Processing, Eclipse, and the OSCP5 libraries
2) Build your Processing application
3) Load and configure OSCP5 libraries
4) Configure your Android device with TouchOSC and Wireless Tether
5) Link your application to the TouchOSC interface
STEP ONE: Prepare your workspace
There’s a lot that goes into preparing a workstation to handle software development with Processing. Some people like their dedicated programming environments, like Eclipse, some people don’t. For this demo we’re just going to be concentrating on setting up your workstation for the basics necessary to get you up and running using Eclipse.
First, you want to install Processing on your computer. Go here:http://www.processing.org/download/ and follow the instructions to install. This tutorial is based on the MacOSX operating system, but there are linux and windows versions as well.
Now you should install Eclipse on your computer and configure it to your liking. This process is kind of involved, and rather than go into it here I’m going to point to a very good online tutorial and the reference pages for ProClipsing, the libraries needed to use Processing objects in a standard JAVA project: http://code.google.com/p/proclipsing/.
Why do I work in Eclipse instead of the Processing IDE? Because I hate debugging in Processing. If you aren’t familliar with using the Eclipse IDE, this is a very good walkthru on how to make a simple Processing sketch in Eclipse: http://processing.org/learning/eclipse/
Download OSCP5 libraries(http://www.sojamo.de/libraries/oscP5/), and get ready to add them to your project and include them in your project’s build path. Since we’ll be doing this in Eclipse instead of Processing, the method of doing this may be different than what you’re used to if you’re used to the Processing IDE. If you’re using the Processing IDE, you can install libraries to your project using this method: http://wiki.processing.org/w/How_to_Install_a_Contributed_Library
Now that you’ve done all that, you’re ready to create a new project in Eclipse (File>New>JAVA Project). Call it whatever you want, for this demo I’m calling it "TouchOSCVisualizer". Save it in your current workspace, for instance: "HD/Users/myusername/Documents/workspace/TouchOSCVisualizer"
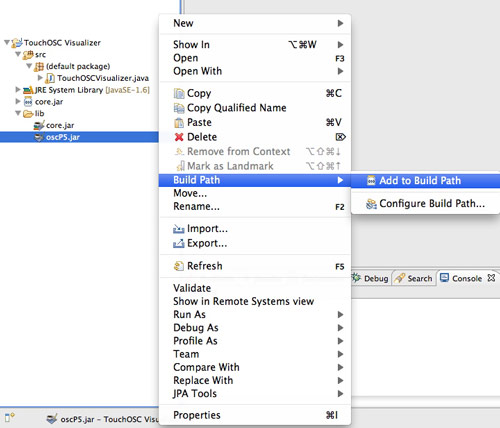
If there isn’t already, create a libraries folder in your working folder, i.e. “HD/Users/myusername/Documents/workspace/TouchOSCVisualizer/lib”. This is where the OSCP5 and Processing core jar files will go– drag them in, then right click on the “oscP5.jar” and “core.jar” files in Eclipse and hit “add to Build Path” in the drop down.
What the hell are these libraries, you ask? The “core.jar” is all the stuff that makes Processing work (if you followed the Proclipsing tutorial you should know where these are), and the “oscP5.jar” that you downloaded is all the stuff that lets your application talk to TouchOSC. Without including these libraries in the build path, your project will not compile.
At this point you should have everything you need–Eclipse, Processing and OSCP5 extras you need to compile to your device. Next step: build your application!
STEP TWO: Build your Processing Application
Alright, now we can actually build something! By now I’m assuming you should have familiarized yourself with the Eclipse IDE and the basics of Processing. If not, get ready to wing it.
First, you want to import your processing libraries and extend your project class like so. Even though you added your oscP5.jar and core.jar files to your build path, your project still needs you to import them:
import processing.core.*;
import oscP5.*;
import netP5.*;
Now, setup your environment with your width, height, and other variables you’ll need later on (the "eq" variables are outside your setup function so you can access them from all subsequent functions).
import processing.core.*;
import oscP5.*;
import netP5.*;
/// eq vars ///////////
int numSquares = 15;
int squareWidth = 100;
int squareHeight = 10;
int numRows;
int numCols;
public void setup() {
size(800, 600);
numCols = screenWidth/squareWidth;
}
There you go– you’ve made a Processing app in eclipse! You can test it from here, although it doesn’t do anything since we haven’t initialized the drawing function. Notice the "numRows" and "numCols" variables… we’ll get to them later.
Now let’s initialize our draw function so we know that everything works:
void draw() {
background(0);
fill(255);
strokeWeight(2);
stroke(65,25,0,65);
ellipse(mouseX,mouseY,20,20);
}
You now have a white spot that follows your mouse around. EXCITING! Once you’ve done this we’ll do something more visually interesting– we’re going to make a EQ-style visualization (like an old 80s stereo) and attach it to the mouse position. Once we get that working, we will attach it to the TouchOSC interface.
Start by making a function "doReadout" that contains two nested "for" loops to spawn a grid of rectangles using the "numRows" and "numCols" variables. One loop builds the columns (the number of which we got earlier by dividing the screen width by the width of one square) and the other loop builds the rows, which it gets by the mouse "y" position.
private void doReadout(){
numRows = screenHeight/mouseY;
//// build columns
for (int i=0; i< numCols; i++){
/// build rows
for(int j=0; j<numRows; j++){
////// rectangle properties: x, y, width, height
rect(i*squareWidth, j*squareHeight, squareWidth, squareHeight);
}
}
}
Then add "doReadout();" into the "draw" function. Every time the "draw" function is called, it fires the "doReadout()" function, which is our "eq" style visuals. When you move your mouse, it re-calculates the number of rows, making the height of your grid move as well. However, this may throw an error when you move your mouse above 0, since you can’t divide the screen height by zero!
Keep in mind the color of the "eq" is still white since you initialized "fill(255);". We’ll change this later.
STEP THREE: Load and configure your OSCP5 Libraries!
So, we’ve managed to do some simple visualization that reacts to mouse movement… let’s go ahead and prep the project to be able to read data sent by OSC!
We’re going to use OSCP5, in particular the "tracker" class from his depth tracking demo. This is an external class that does all the heavy lifting in terms of data processing, so we can keep our main class fairly clean and easy to read.
First thing we do is to make an OSC object and talk to it! Initialize the OscP5 object and give it a name (for this example, I’m calling it "oscP5") like so:
OscP5 oscP5;
Instantiate the object and tell it what port to listen to OSC events in. It seems like 8000 is the standard, so that’s what I use. I normally put this in the "setup" function, since we only need to call it once:
oscP5 = new OscP5(this,8000);
Now build a function that will talk to this object. This function will just sit and wait to see if any OSC messages are coming in. When they do, it will check to see what kind of message it is (more on that later on) and display some text.
private void oscEvent(OscMessage theOscMessage) {
/* print the address pattern and the typetag of the received OscMessage */
print(" addrpattern: "+theOscMessage.addrPattern());
println(" typetag: "+theOscMessage.typetag());
}
We’re going to add a bunch of visualization options to this, but for now let’s just make sure it runs. Compile it– any problems? Strangely enough, it will compile…. but it’s listening to nothing, so you still have to set up and configure your device to run TouchOSC!
STEP FOUR: Configure your iDevice or Android device with TouchOSC (and maybe Wireless Tether as well)
This procedure is different if you use iPad/iPhone or if you use an Android enabled device. First let’s do the simplest– set up TouchOSC for iPad/iPhone.
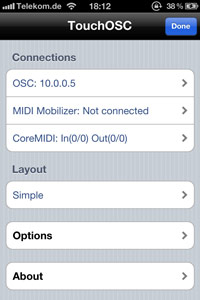
Download TouchOSC from the iTunes store and install it. As soon as you boot up Touch OSC on your iDevice, it asks you for your wifi password. Type it in, and then it will ask you for your hostname/ip address. To see your current hostname or network address, choose Apple > System Preferences, and then click Network. Click on whatever network you’re on and it should show you the ip. Type that in and hit "done".
Your’e done, skip to step five!
However, if you want to use an Android device (for the purposes of this demo, I’m using an HTC EVO) it’s a little more complicated.
First, use your phone to go ahead and download TouchOSC from the Android marketplace at http://hexler.net/software/touchosc-android. The Android version has less features than the iOS version, but it’s free, which is great. Here’s a link to a general walkthru on how to set up and configure Touch OSC: http://hexler.net/docs/touchosc
Interface and Setings screen for TouchOSC
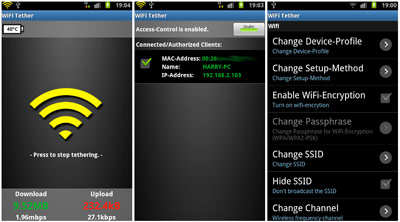
Status screens for "WirelessTether"
You’ll also want to download a wireless tether application so your mobile device can connect with your Eclipse application, I use the very good "Wireless Tether" at h
ttp://android-wifi-tether.googlecode.com, written by Harald Muller, Sofia Lemons, Ben Buxton, and Andrew Robinson. To get this to run properly, you may have to "root" your phone– check out http://www.goodandevo.net/2010/09/how-to-flash-a-zip-on-your-rooted-htc-evo-4g.html for a walkthrough on how to do that. This walkthru is for the HTC Evo, if you have a different device you’ll have to start doing some google searching.
Why do we want to set up wireless tethering, you ask? It seems like the only way to get OSC signals from your Android device to your laptop or workstation is to have your laptop using the wifi from your Android device, NOT from any old LAN line or wireless hub. In theory, you should be able to do this from any network, but I’ve only been able to make it work by tethering my laptop to my Android device. I guess the devices have to have a "handshake" or something.
STEP FIVE: Link Touch OSC to your Processing Application
Now that your android device is talking to your laptop using wireless tether, go ahead and start up Touch OSC on your device, and compile your project– there should be a string of numbers and text that changes as you mess with your inputs as follows:
### received an osc message. addrpattern: /1/push1 typetag: f
### received an osc message. addrpattern: /2 typetag:
### received an osc message. addrpattern: /3 typetag:
### received an osc message. addrpattern: /3/xy1 typetag: ff
### received an osc message. addrpattern: /3/xy1 typetag: ff
### received an osc message. addrpattern: /3/xy1 typetag: ff
### received an osc message. addrpattern: /3/xy1 typetag: ff
### received an osc message. addrpattern: /3/xy1 typetag: ff
Success! You are now sending touchscreen data to your Eclipse application.
Let’s add some deeper functionality! Since we want to hook the TouchOSC interface to the visuals we created earlier on, let’s find an available slider and attach it to the number of rows of the EQ. Since TouchOSC has a bunch of different inputs (dials, sliders, toggles) it’s important to keep track of the input that we’re listening to.
OSC data is all name/value pairs– or, address patterns and their values. Go into the oscEvent function and create a variable called "addr", this will be the address pattern of the OSC data. Once we have that, we can look for ALL the patterns that TouchOSC is sending, as well as the values for those particular patterns.
String addr = theOscMessage.addrPattern();
Now we’ll make a "if" statement that compares the value from the oscEvent with the address pattern. When it hears a particular one, it will trace a statement. Here’s some examples:
if(addr.equals("/1/fader1")){
println("FADER 1");
} else if(addr.equals("/1/fader2")){
println("FADER 2");
} else if(addr.equals("/1/fader3")){
println("CROSSFADE");
} else if(addr.equals("/1/rotary1")){
println("ROTARY INPUT 1");
} else if(addr.equals("/3/xy1")){
println("X and Y control");
}
What’s cool about OSC is that some of the address patterns have more than one float value, for instance "/3/xy1" has a value for x AND for y. To get the values for the particular patterns we’ve found (in this example, your default fader "/1/fader1"), make a new float variable and assign it the value of "theOscMdssage" float value. You’ll take that value, and multiply it by 100 to get a whole number, turn it into an integer and assign it to the number of rows in your EQ visuals.
float val0 = theOscMessage.get(0).floatValue();
if(addr.equals("/1/fader1")){
println("FADER 1");
float v = val0*100;
numRows = (int)v;
} else if(addr.equals("/1/fader2")){
println("FADER 2");
} else if(addr.equals("/1/fader3")){
println("CROSSFADE");
} else if(addr.equals("/1/rotary1")){
println("ROTARY INPUT 1");
} else if(addr.equals("/3/xy1")){
println("X and Y control");
}
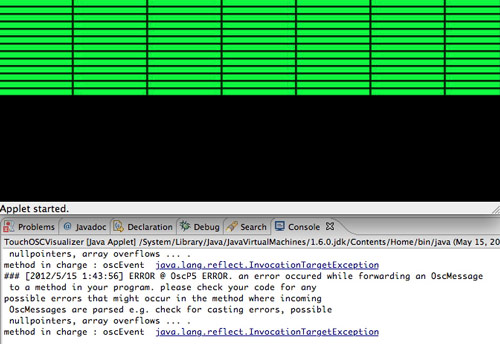
It should look like this! The higher you move fader1, the more rows the EQ visuals have.
Although this is cool, let’s do some color changing. Since we’re using RGB space, we’ll create a new variable called "fillColor" and variables for the R, G, and B values. Our default value is 255 for red so we can see if something is happening right away.
/// color vars
int fillColor;
float colorR = 255f;
float colorG;
float colorB;
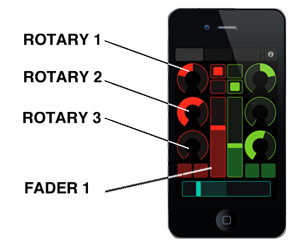
if(addr.equals("/1/fader1")){
println("FADER 1");
float v = val0*100;
numRows = (int)v;
} else if (addr.equals("/1/rotary1")){
// map(value, min1, max1, min2, max2);
colorR=map(val0*100, 0, 100, 0, 255);
}else if (addr.equals("/1/rotary2")){
colorG=map(val0*100, 0, 100, 0, 255);
}else if (addr.equals("/1/rotary3")){
colorB=map(val0*100, 0, 100, 0, 255);
}
Notice the "map" syntax– this is one of the most helpful commands for UI programming in JAVA. It takes any number N from a range of numbers and plots its values to another set of numbers– N = map(value, min1, max1, min2, max2); We do this because we get our input values from TouchOSC at a range from 1 to 100, and we want to convert it to a color range (0 to 255) for each one of our colors.
When you compile it, you should be able to change the color of your visuals by spinning some dials!
What else should we do? This is not really a fun animation– to make something happen requires constant fiddling. It would be cool to make the EQ animate on its own and control its "bounce" rate by "fader 1", rather than move the slider every time we want to do something. We can do this by making a timer to have the height of the EQ squares constantly bounce– basically we’re going to make a click track that will fire off our EQ animation, and the rate of the bounce will be controlled by "fader 1". However, timer objects are apain in the ass in Processing since the java Timer object seems to conflict with the Processing Timer object. We’ll have to use the JAVA version– import the Timer libraries and set a Timer variable called clickTimer. This will fire on a regular basis which we will set using our default "1/fader/1".
This is the final code. Enjoy!