| WII to
MIDI WALKTHRU for Windows by Eric Medine aka MKultra |
||||
| This is a tutorial on how to mix video using a Nintendo Wii controller and VJ Software such as Resolume or Isadora for your PC. I used a Dell Inspiron 8100 with a gig of ram running WinBlows XP, some kinda ATI video card that has disappointed me in the past, and a 2.4 MHZ processor. Running Vista? Haven't tried it yet. If you have Vista and this walkthrough works for you, let me know. | ||||
|
||||
| About the Wii
(from the excellent wii to midi walkthru by ANTIVJ.com) In addition to the traditional buttons, force feedback and the integrated mini-speaker, the true innovation is the presence of a gravity and acceleration sensor (the ADXL330, used in the army or automobile safety, for airbags systems) inside the Wiimote which collects the movements and acceleration of the Wiimote on each of the 3 axis, X, Y et Z. The good news is that rather than using a proprietary protocol to transmit the infos from the Wiimote to the Wii, and then lock its hardware to keep an exclusive use of it, Nintendo has made the excellent decision (probably by commercial will) to use the Bluetooth protocol, standard of communication on PC and Mac for several years. This means that you can connect your Wiimote to your computer, and program it rather simply for any use you want. About this tutorial What you will need Other resources: |
||||
| STEPS:
1) Connect your wiimote to your pc 2) Convert the signals the wiimote sends to MIDI 3) Rock it, rockstar! |
||||
| STEP ONE: Connect your wiimote to the PC | ||||
If you have Bluetooth built into your computer skip to part 2. If you dont, you may take this opportunity to install a ridiculously expensive Bluetooth adapter and construct a delicate web of buggy freeware-- PC only, of course. If you have a mac you can probably just plug and play the damn thing.
|
||||
Click on the second radio button to "find a specific Bluetooth device and configure how this computer will use its services". Hit the 1 and 2 buttons simutaneously on your wiimote (switches it to "discoverable mode") then hit "next" in the dialog box. Watch the flashing blue lights while the wiimote tries to talk to your Bluetooth adapter!
|
||||
Once you select your wiimote and hit "next", you will get to the "pairing" screen. Ignore it-- hit "skip pairing". I tried to initiate pairing, but I couldn't find a number on my wiimote, except some weird serial number that didn't seem to do anything. What is pairing? I don't know. This is taking too long. |
||||
Hit "Finish". Your Bluetooth logo in your toolbar should turn green. Your wiimote is now connected to your PC! |
||||
| STEP TWO: Convert the signals the wiimote sends to MIDI | ||||
| Now that your wiimote is talking to your computer, it's time to
configure some softwares to listen to what it says! You will be using
GlovePie,
a program that was originally created to work with the
Essential Reality P5 Glove-- classic! This software developed
by Carl Kenner has the role of converting any type of signal (from
a mouse, Joystick, a P5 glove) into another signal (MIDI, variables...)
using a simple scripting language and/or a GUI.
Anyway, when you open it up it displays an empty script editor, basically you type in the commands you want your control module (in this case, the wiimote) to execute and hit "Run". There's an autogenerate, but I have not really experimented with it yet. Raw coding is intimidating, but fortunately there are loads of scripts provided with the install: for example, go to the "File" dropdown menu, then open "WiimoteScripts/WiiMouse 0.1.PIE", and click on RUN, and you can now control your mouse cursor with your Wiimote.This is what I used to make sure that the wiimote is actually working-- up untill now, the only proof you have that it works is a stupid dialog box. If you run "WiiMouse 0.1.PIE" and your cursor drifts up to the top left of your screen-- your wiimote has not been detected properly. Go back to some previous steps, try again! I sometimes use "WiimoteIdentifier.PIE" to check if it sees any wiimotes, but it seems like it can "see" the wiimote without "hearing" the data. If you are dancing your mouse around the screen with your wiimote, you are almost done! B) Load the Wiimote to Midi script into GlovePie. Antivj.com has the newest version of the script here, or you can copy, paste and RUN the script below. After you copy and paste this code into GlovePie, be sure to save it for later-- call it something like "WIItoMIDI.PIE". Be sure to uncomment/comment out the appropriate sections to disable key commands from your wiimote if you are planning to use it more... unconventionally. This script ( beta0.1), you get the value of X, Y and Z slope value from your Wiimote, which are converted into #CC values 30, 31 and 32, variables from 0 to 127. Sometimes this seems to make sense to me, sometimes not. Are we done yet?
//Keyboard notes /* One = Wiimote.One X = Wiimote.Classic.x //Midi notes midi2.C0 = Wiimote.Up or Wiimote.Classic.Up midi2.G0 = Wiimote.A or Wiimote.Classic.a midi2.B0 = Wiimote.Minus or Wiimote.Classic.Minus midi2.E1 = Wiimote.One
/******************************** // these are the magic line, which converts X, Y
and Z rotation values to Midi #CC 31, 32 and 33. var.xRot = Wiimote.RawForceX + var.xOffset midi2.Control31= (EnsureMapRange(var.xRot, 26,-26,
0,1)) //Old code: (MapRange(var.xRot, 26,-26, 1,127)-1)/127
|
||||
| C) LAST STEP! Configure your computer to send and receive MIDI data | ||||
| Now it is time to check to make sure Glovepie is sending the appropriate
data by installing and running MidiOX
(a virtual MIDI port, which emulates a MIDI device to use like a "bridge"
with your midi softwares).
If the numbers are scrolling rapidly, YOU ARE GOOD TO GO! Your wiimote is going into GlovePie, and then into MIDIOX, and from there you can send it to another MIDI device, or use it to control video mixing software. |
 A.
Install your Bluetooth USB adapter (I used a
A.
Install your Bluetooth USB adapter (I used a  B.
Configure your Bluetooth adapter. Once your driver and
the Bluetooth adapter is installed, you should see the funky blue
Bluetooth logo in your toolbar. Right click on it (or go thru your
Start menu) and do a "Explore My Bluetooth Places". A
folder will open up, click on "Bluetooth Setup Wizard",
and you will get this dialog box.
B.
Configure your Bluetooth adapter. Once your driver and
the Bluetooth adapter is installed, you should see the funky blue
Bluetooth logo in your toolbar. Right click on it (or go thru your
Start menu) and do a "Explore My Bluetooth Places". A
folder will open up, click on "Bluetooth Setup Wizard",
and you will get this dialog box. C.
Select your Bluetooth device (in this case, a wiimote).
Now the dialog box will say "Select a Device" and there
will (hopefully) be a picture of your wiimote to select. Select
it, then hit "Next!" If your wiimote does not show up,
try to re-initiate: hit "search again" in the dialog box,
switch to "discoverable mode" on your wiimote (hit the
1 and 2 buttons simultaneously), etc.
C.
Select your Bluetooth device (in this case, a wiimote).
Now the dialog box will say "Select a Device" and there
will (hopefully) be a picture of your wiimote to select. Select
it, then hit "Next!" If your wiimote does not show up,
try to re-initiate: hit "search again" in the dialog box,
switch to "discoverable mode" on your wiimote (hit the
1 and 2 buttons simultaneously), etc. D.
Configure your wiimote. Now that your computer sees your
wiimote, you need to select it. Again. It seems like I needed to
constantly switch to "discoverable mode" on my wiimote
(hit the 1 and 2 buttons simultaneously) during this entire process.
D.
Configure your wiimote. Now that your computer sees your
wiimote, you need to select it. Again. It seems like I needed to
constantly switch to "discoverable mode" on my wiimote
(hit the 1 and 2 buttons simultaneously) during this entire process. A)
Start up GlovePie. I don't recall if it even needs an install,
but I remember having some problems when running it off my desktop,
then moving it to my Programs folder, then running it again.
A)
Start up GlovePie. I don't recall if it even needs an install,
but I remember having some problems when running it off my desktop,
then moving it to my Programs folder, then running it again. 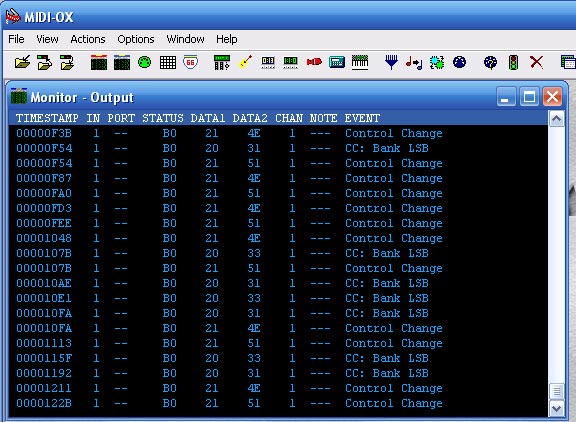 After
you install
After
you install